Trees are vital for a landscape and provide many benefits, including a cooler environment, higher air quality, and more beauty. However, they need to be properly maintained and cared for.
This is where a good Tree Service company comes in. These professionals have the experience and equipment to perform tree trimming, pruning, removal, and other services safely. Contact Tree Service El Cajon now!
Tree services help property owners maintain their trees’ health and aesthetics, and reduce the risk of damage or injury to people and their property. They can include pruning and trimming, which keep tree limbs from overhanging homes or power lines, as well as addressing diseased and insect-infested trees. Other common services are stump grinding and removal, which address leftover stumps after a tree is removed, as well as site cleanup and debris removal.
It’s important to hire a professional tree service for these tasks, as they have the proper equipment and training to do them safely. They can also help you plan and execute your tree maintenance schedule, and address any problems quickly and efficiently. When choosing a tree service, make sure to compare at least three estimates, and ask for a list of references with contact details. Also, ask about the company’s insurance coverage and worker’s compensation.
Often, tree removal is necessary to prevent damage or injury. It can be extremely dangerous to try this on your own, especially if the tree is located near a house or other structure. It’s also difficult to predict the direction a tree will fall, which can lead to serious injuries or property damage. A professional tree service can remove the tree safely and quickly, minimizing the potential for damage.
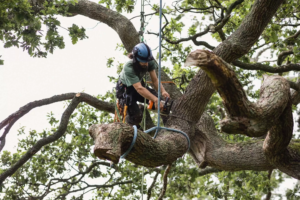
NYC Tree Trimming & Removal Corp offers a variety of tree services for residential and commercial properties. Its crews can trim and prune trees to reduce their size, and eliminate overhanging branches that threaten roofs or power lines. They can even remove damaged or dying trees, as well as ones that are obstructing the view of driveways, roads, and buildings.
They can also grind and remove tree stumps, preventing them from becoming breeding grounds for insects or fungi. Then, they can clean up the debris and cart it away in a truck to be disposed of properly. They can also do hazard assessments to determine the safety of your trees, and suggest measures for their protection. Lastly, they can provide emergency tree services to address storm damage and sudden tree failure.
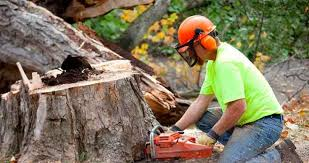
Tree Pruning
Tree trimming and pruning can enhance the appearance of your home landscaping. It can also improve your safety and protect your property from damage by falling trees during storms or high winds. In addition, it can help your lawn and other plants thrive by letting more sunlight reach them. This service can involve pruning or removing dead branches and stems, and can even include cabling or bracing weaker trees to support their growth.
When left unattended, overgrown trees can create a mess and obstruct views, block access to buildings, or interfere with power lines. Regular trimming and pruning can remove these problems, allowing your trees to thrive. It can also reduce your maintenance costs by preventing the need for removal or replacement of unhealthy trees.
It can also improve your yard’s aesthetics by making it more appealing to visitors and passersby. A well-trimmed tree looks neat and well-maintained, and it can increase the value of your home. In addition, it can also prevent the spread of diseases from one tree to another by removing diseased or dead branches.
If you have a lot of trees on your property, it’s important to hire a tree services company to keep them looking their best. The experts can prune your trees regularly to prevent them from becoming overgrown or unhealthy. They can also help you get rid of unwanted branches and shrubs that are taking up too much space. They can also perform other tree services such as stump grinding and debris cleanup to keep your property looking great.
While it may be tempting to do tree trimming and pruning yourself, this is a dangerous task that requires professional equipment and knowledge of proper technique. It’s also important to know how often to prune your trees to avoid causing damage or creating a hazard. To avoid these risks, contact a professional who can provide tree services in New York. They will trim and prune your trees to help them stay healthy and safe, and they can even do other tree services like soil maintenance and watering.
Tree Disease Treatment
Trees with disease or pest infestation can impact the look of your landscape. But, you can often save the tree with expert treatment. We offer a variety of services to treat fungus and diseases, promoting a healthy, vibrant landscape.
The first step in saving a sick tree is diagnosis. Your arborist will examine the appearance of the tree and determine the cause. From there, we will determine the best course of action to take. Whether it’s pruning infected branches, fertilization, medication, or something else entirely, our team has the tools and knowledge to help you save your tree.
Stem pathologies are induced by fungi and, like leaf pathologies, have more severe consequences for the plant if they reach the vascular system. For example, rust is one of the most common evergreen tree diseases in Arkansas pines and, when it reaches the inner bark, is lethal for young trees. Other stem diseases are less severe, such as crown galls that affect magnolia trees, or root rot that affects spruce and other conifers.
Anthracnose is a fungal infection that can be very damaging to many hardwood species, such as dogwoods and oak varieties. It thrives during cool, wet weather in early spring and over time can weaken or kill the tree.
Canker diseases are a fungal or bacterial disease that can affect almost any type of tree, but are most likely to show up on stressed trees. They start when a branch or trunk is cut, injured, or damaged, and bacteria and fungi enter the wound and spread through the entire tree. Some canker diseases, such as canker of sweetgum, create large ridges, making them easy to identify, while others, such as chestnut blight and hypoxylon canker, do not.
Improving soil conditions and reducing stress levels can greatly improve resistance to disease. Thinning the canopy can also improve air circulation, which reduces infection. Similarly, fertilization and other soil treatments improve root health and stimulate the natural defenses of your plants. Likewise, insecticides can control insects that carry diseases, such as bark beetles and other invasive wood-boring species.
Tree Stump Removal
Tree stumps are more than an eye sore – they’re a tripping and safety hazard, attract termites and other pests, and can grow harmful funguses. A professional stump removal service can remove the stump and root system completely, giving your yard a clean slate and making way for whatever you have in store for it.
A lot of work goes into removing a tree stump. It’s a high risk job that should be done by professionals with the proper equipment. If you’re considering trying to do it yourself, here are a few things to keep in mind:
First and foremost, it’s important to consider the size of the stump and its root system. The larger the stump and the more complex the root system, the more expensive it will be to remove. You should also be aware of whether or not you’ll need to rent or buy equipment. Depending on the size and location of your property, you may need to clear away brush and debris in order to gain access to the stump. It’s a good idea to clear the area of underground utilities before starting so that you don’t accidentally damage any pipes or lines.
Lastly, you’ll want to factor in the cost of fuel. A large stump takes a lot of fuel to grind or burn, and the price of gas can quickly add up. It’s also important to consider the cost of labor if you’re going to hire a company to do the work for you. Depending on your location, you may need to pay extra for travel expenses or other labor costs, such as digging up and transporting the stump and roots.
Stump grinding is more affordable than stump removal, but it leaves a part of the stump in the ground. Choosing to remove the entire stump and its root system can be more expensive but it’s the most effective way to clear out your yard and get back to work. Regardless of which option you choose, the best way to save money on tree stump removal is to ask about discounts for multiple stumps at the same time.